Let us cry for the spilt milk, by all means, if by doing so
we learn how to avoid spilling any more. Let us cry for the
spilt milk, and remember how, and where, and why, we spilt it.
Much wisdom is learnt through tears, but none by forgetting
our lessons.
- Maria Amparo Ruiz de Burt

Wednesday, November 14, 2012
Saturday, October 27, 2012
Jelly Roll Quilt
I finally completed my first 'jelly roll' quilt!! Yea ME!! This is what a 'jelly roll' of fabric looks like. It is a bunch of 2.5 inch strips of fabric in a roll. The colors go well together and end up making a quilt topper.

This was a bigger project than I expected! Started off with a full size jelly roll and made the "front" (in my mind it is the front!) side of the quilt. I saw this on YouTube and got inspired to make my own. I've seen the jelly rolls at Tuesday Morning and always wanted to make something out of it, but never had an idea of what to do with it, but now I've made my own EASY quilt!! ...again YEA ME!!!
This is my daughter playing "Vanna" and displaying the front of the quilt. The green border around the quilted strips is a $5.00, 200 thread count, twin size sheet from WalMart. I just sewed the quilt on top of the sheet. Much easier than sewing a border around the sheet. Phew, after I did that I felt like I saved a couple hours of measuring and pinning and sewing.
 You can see the green border much better in this view.


Alina is now chill-axing on the backside of the quilt! She was exhausted after showing off the front of the quilt. This part was a bunch of scraps sewed together to make a quilt for the back also. It isn't exactly the picture I had in my head, but turned out pretty good. The final touch that I wanted was a soft border around the entire quilt. I wanted the same feeling I had when I was a kid, a smooth, satiny, soft trim around the blanky!
 I found some bright pink and brown satin at JoAnn Fabric.
 Both sides of the quilt were sewn around an old blanket that once belonged to my daughter. It was a win-win situation for me, covered a blanket that would have otherwise been thrown out, and made a cozy "new" quilt for me to use on a cold winter day!
This was a bigger project than I expected! Started off with a full size jelly roll and made the "front" (in my mind it is the front!) side of the quilt. I saw this on YouTube and got inspired to make my own. I've seen the jelly rolls at Tuesday Morning and always wanted to make something out of it, but never had an idea of what to do with it, but now I've made my own EASY quilt!! ...again YEA ME!!!
This is my daughter playing "Vanna" and displaying the front of the quilt. The green border around the quilted strips is a $5.00, 200 thread count, twin size sheet from WalMart. I just sewed the quilt on top of the sheet. Much easier than sewing a border around the sheet. Phew, after I did that I felt like I saved a couple hours of measuring and pinning and sewing.


Alina is now chill-axing on the backside of the quilt! She was exhausted after showing off the front of the quilt. This part was a bunch of scraps sewed together to make a quilt for the back also. It isn't exactly the picture I had in my head, but turned out pretty good. The final touch that I wanted was a soft border around the entire quilt. I wanted the same feeling I had when I was a kid, a smooth, satiny, soft trim around the blanky!


Quote of the Day
I have not failed. I've just found 10,000 ways that won't
work.
-- Thomas A. Edison
-- Thomas A. Edison
Saturday, October 13, 2012
Addition to Shower Curtain Rings....
An addition to a previous post about a bathroom update!!! After updating the shower curtain rings I thought I should improve on the shower curtain. Click here to see curtain ring update. The white one we had was about 15 years old. It wasn't very exciting and just needed a slight kick in the pants!!! LOL. So I found a bunch of fabric scraps that I had around the house and "quilted" together a new curtain.
 You can see the flowered rings and my new curtain. I'm glad you can't get too close to it to see all the tiny mistakes that I made!!
 The white scrap in the middle of the picture below is the old curtain. Thought it wouldn't be bad to reuse a piece of the old one.
 The white fabric at the top (that the rings are hanging from) is my old curtain. I used that so I didn't have to add all the button holes! Made it a lot easier.
 Also, I use an extra curtain rod to hang towels from. I like it better than having the towels over the actual curtain rod, I feel like the bath towel doesn't get totally dry if it is touching the wet shower liner.
I know what you are thinking - she is really weird!!! Guess so!
Thanks for looking,
Have a great day,
Cathy


I know what you are thinking - she is really weird!!! Guess so!
Thanks for looking,
Have a great day,
Cathy
Tuesday, October 2, 2012
Kitchen Hand Towels
While looking around on PINTEREST I saw these super cute dish towels. My first thought was "I can do that...." No problem! Except I don't have the patience or the expertise to make these. Nor to do I seem to have the time!!
I love the look of these and this would make it so much easier to keep the dish towels off the floor! Check out the details here.
 And then I saw another idea for keeping towels off the floor! Check it out here.
 These are awesome ideas!!! However I am NOT that motivated to alter each towel!!! I needed an idea that was a little simpler, a little less work for me!
My first thought was to sew buttons and button holes on each towel. I love the look but again too much work! Button holes AND sew on buttons - not enough time!
 There were a couple other ideas involved between this idea and the final creation, but I'm not brave enough to show them to the 10 people who may look at this! Not sure if this is a combination of a couple ideas or if I saw it somewhere while checking out blogs, but this is the best one for me. I thought of this as a way to create the strap on the oven door and not have to make alterations on each towel. The final result helps to keep the kitchen towels OFF the floor. Anyone else have that problem?? Drives me crazy!

 This is the towel holder with all the pieces taken apart. Makes it very easy to change towels out and since the straps are made from fabric scraps they can be washed and it is SO easy to make.

Not sure if this is enough details to show my ideas, but this shows the basics. I hope! :)
Thanks for looking,
Cathy
I love the look of these and this would make it so much easier to keep the dish towels off the floor! Check out the details here.
 And then I saw another idea for keeping towels off the floor! Check it out here.
 These are awesome ideas!!! However I am NOT that motivated to alter each towel!!! I needed an idea that was a little simpler, a little less work for me!
My first thought was to sew buttons and button holes on each towel. I love the look but again too much work! Button holes AND sew on buttons - not enough time!
 There were a couple other ideas involved between this idea and the final creation, but I'm not brave enough to show them to the 10 people who may look at this! Not sure if this is a combination of a couple ideas or if I saw it somewhere while checking out blogs, but this is the best one for me. I thought of this as a way to create the strap on the oven door and not have to make alterations on each towel. The final result helps to keep the kitchen towels OFF the floor. Anyone else have that problem?? Drives me crazy!
 This is the towel holder with all the pieces taken apart. Makes it very easy to change towels out and since the straps are made from fabric scraps they can be washed and it is SO easy to make.
Not sure if this is enough details to show my ideas, but this shows the basics. I hope! :)
Thanks for looking,
Cathy
Quote for the Day
I, not events, have the power to make me happy or unhappy today. I can choose which it shall be. Yesterday is dead, tomorrow hasn't arrived yet. I have just one day, today, and
I'm going to be happy in it.
~~ Groucho Marx
~~ Groucho Marx
Friday, August 31, 2012
Shower Curtin Rings
I was getting sick of looking at our Virginia Tech shower curtain holders. We have had them in the master bath for a couple years and I needed a change! This was the before look. Wasn't sure what to change it to, but the idea hit me while walking around in the Dollar Tree.
 I saw these shower curtain rings and I knew that I had a TON of fabric flowers carefully stored at home (that of course means they were stuffed in a shoe box!). So I made the connection - improve the shower look and use up some of my flowers! BINGO!!
 I dug through my box of flowers and found all the yellow-ish ones! Yellow is my favorite color and thought it would brighten up the small bathroom. I just sewed the flowers to the each one of the rings then secured it with a little hot glue. Presto!! I think they look better than the VT hooks.
 I took a close up of each group.....


 Not too bad! Not perfect but it will do for now! :-)
Thanks for looking and have a great day.
Cathy
Tuesday, August 28, 2012
Quote for the Day
Be more concerned with your character than your reputation, because your character is what you really are, while your reputation is merely what others think you are.
~~ John Wooden
~~ John Wooden
Wednesday, August 22, 2012
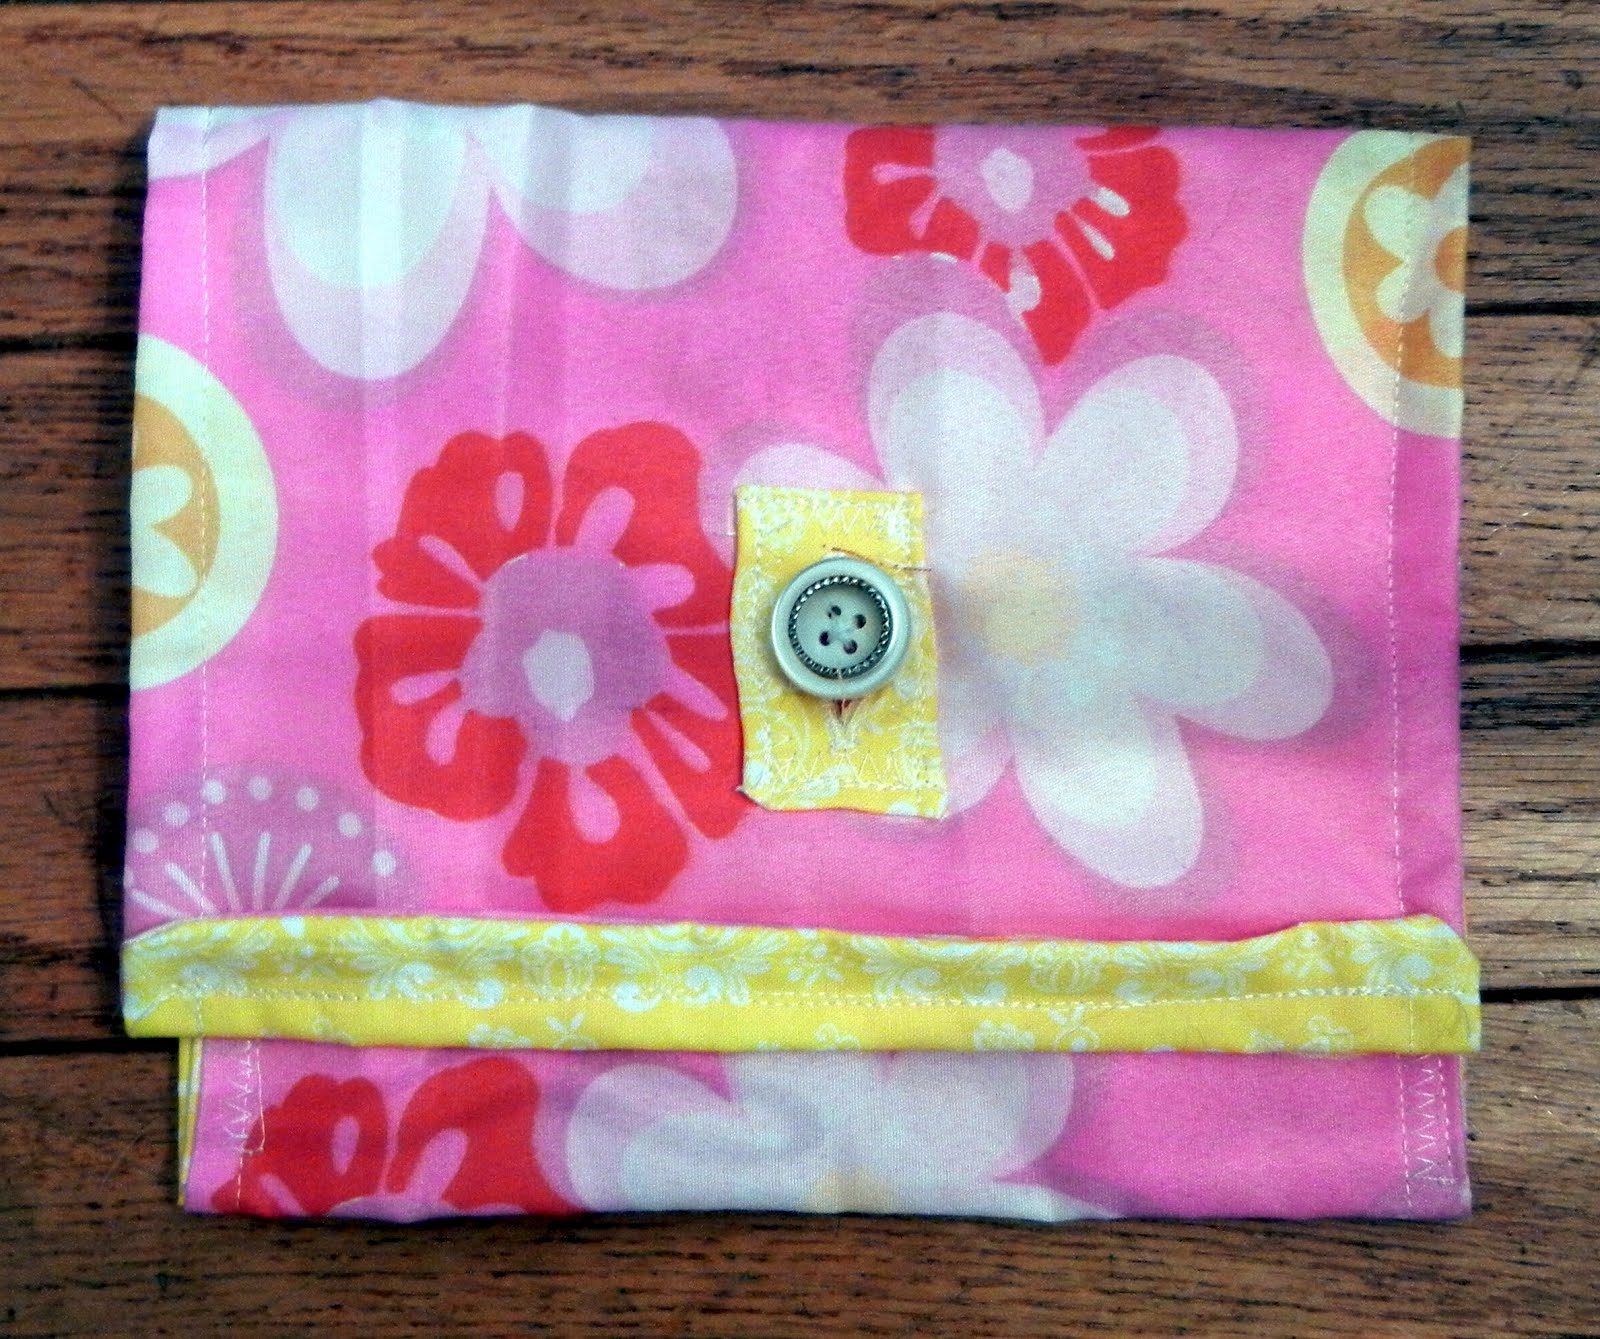
Extra Coupon Wallet
I LOVE couponing!! It is such a challenge to find all the sales then save, save save!!! However I inevitably have coupons that haven't been sorted and put in my binder after cutting them out. SO I needed a little wallet type holder for the extras - kinda like a holding spot until I get around to putting them in their correct spot. I used a couple fabric scraps to make this little extra coupon wallet. Very simple and comes in handy when I just can't finish organizing my coupons in one evening!
 I love the bright yellow lining! So happy!


This is a quick look at my coupon binder! I carry the binder around in this bag - made from 2 cloth napkins. Not really pretty but gets the job done. My next project is going to be to make a much cuter bag for my coupon binder!

The binder is from Staples. I like the 3.5 inch size, easy to put lots of "stuff" in there! I also like a pencil case inside just in case there is a paper clip emergency!! LOL!

There are about 35 categories for coupons. I used The Krazy Coupon Lady's ideas for the categories. She has tons of great ideas there! Also the BEST database of printable coupons.

The coupon pages are baseball card pages. I found them at the Dollar Tree. Not sure how many are in a package, but the work great. I've also seem them at Office Depot or Staples but they cost more there.
Thanks for looking! Happy Couponing!
Cathy
 I love the bright yellow lining! So happy!

This is a quick look at my coupon binder! I carry the binder around in this bag - made from 2 cloth napkins. Not really pretty but gets the job done. My next project is going to be to make a much cuter bag for my coupon binder!

The binder is from Staples. I like the 3.5 inch size, easy to put lots of "stuff" in there! I also like a pencil case inside just in case there is a paper clip emergency!! LOL!

There are about 35 categories for coupons. I used The Krazy Coupon Lady's ideas for the categories. She has tons of great ideas there! Also the BEST database of printable coupons.

The coupon pages are baseball card pages. I found them at the Dollar Tree. Not sure how many are in a package, but the work great. I've also seem them at Office Depot or Staples but they cost more there.
Thanks for looking! Happy Couponing!
Cathy
Wednesday, August 1, 2012
Grocery Bag from Scraps
Mmmmm what to do with my fabric scraps and an old pillow case???? I admit I'm a "bag lady"!! So what else is there to make but a reusable bag. Easy peasy!
 This is a small selection from my MOUNTAIN of fabric scraps! I had an idea just itching at my brain - to make a reusable grocery bag from a pillowcase. It seemed so easy to me.... just cut the scraps and sew them together.
I started by cutting 3.5 inch strips from each fabric. They were all the same length so I didn't have to decide on a length! The measurements were purely by chance! I was just hoping that they would work out, no pre-planning involved here!
After cutting all the strips, just sewed the pieces together.
Next I folded the "quilt-like" pieces in half lengthwise and cut. This was to make both sides of the bag.
To make sure the pillowcase fit just right, I cut that after making the quilt part. And, to my surprise the width was just right. I had to trim up the length by cutting the pillowcase. Not a big deal.
Because I'm a wild and crazy kinda girl, I put one side vertical stripes.....
 and the other side horizontal stripes! Cute! The handles are made from 3.5 inch strips also.
 To make sure the pillowcase stayed securely in the bag, I sewed buttons on the bottom corners. It looks nice and serves a purpose.
 Finally, as an added touch and to secure the handles in place I sewed buttons at the base of each handle. Buttons are my favorite embellishment! Love it.
 Sorry I don't have more pictures for you to see. I have to get better at taking pictures while working.
Thanks for looking
Have a great day.
Cathy
 This is a small selection from my MOUNTAIN of fabric scraps! I had an idea just itching at my brain - to make a reusable grocery bag from a pillowcase. It seemed so easy to me.... just cut the scraps and sew them together.
 I started by cutting 3.5 inch strips from each fabric. They were all the same length so I didn't have to decide on a length! The measurements were purely by chance! I was just hoping that they would work out, no pre-planning involved here!
After cutting all the strips, just sewed the pieces together.
Next I folded the "quilt-like" pieces in half lengthwise and cut. This was to make both sides of the bag.
To make sure the pillowcase fit just right, I cut that after making the quilt part. And, to my surprise the width was just right. I had to trim up the length by cutting the pillowcase. Not a big deal.
Because I'm a wild and crazy kinda girl, I put one side vertical stripes.....
 and the other side horizontal stripes! Cute! The handles are made from 3.5 inch strips also.
  To make sure the pillowcase stayed securely in the bag, I sewed buttons on the bottom corners. It looks nice and serves a purpose.
  Finally, as an added touch and to secure the handles in place I sewed buttons at the base of each handle. Buttons are my favorite embellishment! Love it.
  Sorry I don't have more pictures for you to see. I have to get better at taking pictures while working.
 Thanks for looking
Have a great day.
Cathy
Saturday, July 7, 2012
Full Length Mirror "Blinged UP"!
All right there really isn't any BLING added to the mirror, but it was embellished with my favorite embellishment - BUTTONS!! Bling sounded better than buttoned-up!!
I wanted a full length mirror in my bedroom (I was getting sick of asking my 11 year old daughter if I could borrow hers!), but didn't want a Blah one!
Started off with a plain $5.00 mirror from Wal-Mart, and added my own touch to it. This is the final product -
 Sorry about the blurry pictures, I think the camera was focusing on the trees in the reflection!

 I think it turned out pretty cute. Used my trusty hot glue gun and a bunch of buttons that I bought at Michaels in a bucket (and of course used my 50% off coupon!). Total cost was less than $8.00.
 Love it!
Thanks for looking.
Cathy
I wanted a full length mirror in my bedroom (I was getting sick of asking my 11 year old daughter if I could borrow hers!), but didn't want a Blah one!
Started off with a plain $5.00 mirror from Wal-Mart, and added my own touch to it. This is the final product -
 Sorry about the blurry pictures, I think the camera was focusing on the trees in the reflection!
 I think it turned out pretty cute. Used my trusty hot glue gun and a bunch of buttons that I bought at Michaels in a bucket (and of course used my 50% off coupon!). Total cost was less than $8.00.
  Love it!
Thanks for looking.
Cathy
Wednesday, June 27, 2012
Quote for the Day
Happiness is like a butterfly which, when pursued, is always beyond our grasp, but, if you will sit down quietly, may alight upon you.
~~ Nathaniel Hawthorne
~~ Nathaniel Hawthorne
Tuesday, June 19, 2012
A Little Giggle for Today
SKIPPING CHURCH!!!
A church Pastor woke up Sunday morning and realizing it was an exceptionally beautiful and sunny early spring day, decided he just had to play golf.
So... he told the Associate Pastor that he was feeling sick and persuaded him to preside over the services for him that day.
As soon as the Associate Pastor left the room, the Pastor headed out of town to a golf course about forty miles away.
This way he knew he wouldn't accidentally meet anyone he knew from his church. Setting up on the first tee, he was alone. After all, it was Sunday morning and everyone else was in church!
At about this time, Saint Peter leaned over to the Lord while looking down from the heavens and exclaimed, "You're not going to let him get away with this, are you?"
The Lord sighed, and said, "No, I guess not."
Just then the Pastor hit the ball and it shot straight towards the pin, dropping just short of it, rolled up and fell into the hole.
IT WAS A 420 YARD HOLE IN ONE!
St. Peter was astonished. He looked at the Lord and asked, "Why did you let him do that?"
The Lord smiled and replied, "Who's he going to tell?"
Tee hee hee!!! Love that one! Have a giggly day!
Cathy
Saturday, June 16, 2012
Cute Gift Bag
A co-worker of mine is getting married in a couple weeks and I wanted to give her a small gift. Unfortunately, I didn't have any (last minute) NEW cute ideas for a gift so it was the same one as seen here. I know not very imaginative but it is personalized and she seemed to love it!!
The part I was stressing about was the gift bag. Since I was bringing it into work, I wanted it to look GOOD so everyone would enjoy it!!! I keep a couple extra white gift bags on hand so, in a pinch, they can be used for any occasion. I started with the printed wedding paper at the bottom of the bag, then added the green paper at the top.... then what to embellish with??? Easy peasy, make paper flowers from the scraps!!! BINGO!! I used the process shown here to make the paper flowers at the top of the bag. VERY EASY!!! She did a great job of showing the process.

 Put some Dollar Store "gems" in the middle for a little bling!
 Pretty cute! Only took about 15 minutes to finish!
Enjoy, thanks for looking.
Have a great day
Cathy
The part I was stressing about was the gift bag. Since I was bringing it into work, I wanted it to look GOOD so everyone would enjoy it!!! I keep a couple extra white gift bags on hand so, in a pinch, they can be used for any occasion. I started with the printed wedding paper at the bottom of the bag, then added the green paper at the top.... then what to embellish with??? Easy peasy, make paper flowers from the scraps!!! BINGO!! I used the process shown here to make the paper flowers at the top of the bag. VERY EASY!!! She did a great job of showing the process.

 Put some Dollar Store "gems" in the middle for a little bling!
  Pretty cute! Only took about 15 minutes to finish!
 Enjoy, thanks for looking.
Have a great day
Cathy
Sunday, May 13, 2012
Teacher Appreciation Gifts
This year to show appreciation for all the hard work and dedication to
my kids teachers I was stumped. I love both of their teachers and it is
hard to explain how much I appreciate all they have done this year.
Unfortunately, my husband lost his job and is still looking for another
so we are a little strapped right now. So I looked through my "stash" of craft stuff!
my kids teachers I was stumped. I love both of their teachers and it is
hard to explain how much I appreciate all they have done this year.
Unfortunately, my husband lost his job and is still looking for another
so we are a little strapped right now. So I looked through my "stash" of craft stuff!
Found these Christmas baskets!! Bingo! A little spray paint, and a new flower and get rid of the bells!
 This is what the basket started like... and
  Presto!!! Now to stuff them with some of the handmade cards that are sitting in boxes in my craft room.
 I like both flowers! Not sure which one is better. The teachers seemed to love their gifts. AND, the price was right - just the cost of a can of yellow spray paint! Right in my tight budget!!
Thanks for looking!
Have a great day,
Cathy
Sunday, April 15, 2012
LOVE These Flowers
During one of my recent sleepless night of checking out new ideas on Pinterest I found these super cute flowers. So darn cute and seem very easy to make.
Check out what Make Bows and More did here and a very easy tutorial to follow.
 I'll have to post again when I make some of my own.
Thanks for looking,
Cathy
Check out what Make Bows and More did here and a very easy tutorial to follow.
 I'll have to post again when I make some of my own.
 Thanks for looking,
Cathy
Wednesday, March 28, 2012
Valentine's Day for Hubby
This year for Valentine's Day I wanted to do something "cute" and inexpensive for my husband. Didn't want to go too crazy with all the candy and hearts stuff. He really isn't in to all that.
 I wanted to do something that reminded me of the old initials carved in a tree trunk. I always loved that when someone took the time to carve their initials and a heart in a tree! So sweet, also showed that it would be there forever! That thought kept going through my head, hmmmm..... not sure on how to replicate that idea.
I thought a wooden frame with our initials on it! YES, that's the answer!
 This is what it looked like before painting and assembling.
 tTaaaa Daaaa! Here is the final project! He said he loved it! Now hanging in his home office.
  Thanks for looking. Have a great day!
Cathy
Subscribe to:
Posts (Atom)